Homework 1
Due: Sep 12, prior to 11:59:59 PM
Computer Setup
There are a lot of things you can do to set up you computer for this course. The document covers what I did. In this assignment you will replicate my setup. After this assignment you can continue to use this setup (suggested), or do something totally different.
Be aware that all programs MUST run on the lab computers. Likewise all homework must be submitted through the lab computers.
Please note: this is a really long configuration process, with many places to go wrong. I have checked this on both
Windows and Macs, but it is possible that I missed some steps. I encourage you to follow these directions slowly. Do
you best to understand, not just type. (I know that there is a lot here that you may not understand.)
TYPOGRAPHY:Commands to be typed into a terminal appear on lines by themselves and in
the teletype font.
Step 1: Install Software
We will be using one (1) package during the course that you should install on your personal computer:
- Visual Studio Code -- an IDE (Integrated Development Environment). I use VSC for all editing and running. Download at https://code.visualstudio.com/download. If you want to use a different IDE (after this assignment), that is OK. (Again, you will be on your own.)
- OptionalGo
Go is available for both Mac and Windows from https://go.dev/doc/install. Follow the directions. Any version later than 1.19 is fine. (I have 1.19.4.) If you are doing the remote development thing as described in this homework, you do not really need to install Go.
- OptionalRust
Rust is available for both Mac and Windows at https://www.rust-lang.org/tools/install. Follow the directions. The current version is fine. (I have version 1.69.0).
Step 2: Set up VSC
(These direction work on my Mac. They are less tested on Windows. If you find issues, let me know.)
Beyond the basic VSC installation, I use -- and recommend using -- the following extensions:
- Remote Development v 0.24.0 by Microsoft
- (Required for this assignment.) This is an extension pack (it installs several extensions). It allows you to use VSC on your own device to directly edit files on remote machines. (I use this package to write all of the programs for this course.)
- (Not required for this assignment.) Go v0.39.1 by Google
- You can wait on installing this until we get to Go.
- Rust Analyzer v0.3.1607
- Again this can wait. We will not get to Rust until mid semester
Step 3: Set up public/private keys
This makes it very easy to transmit materials between your computer and the lab computers -- and also to log into the lab computers. This is pretty much required to use the remote development extension of VSC. (If you already have a public/private key pair set up then do not create another pair.)
- Create a Public/Private key
Open a terminal window (You will use terminals a lot this semester.)
On a mac: Start the Terminal program. It is in Applications/Utilities
On Windows: Open a windows powershell (type powershell in the search box in lower left then hit enter)
(Mac and Windows) You can also open a terminal from within VSC (Terminal Menu / New Terminal)
-
Enter the following command to start the key generation process
ssh-keygen -t rsa
Press the ENTER key to accept the default location.
The ssh-keygen utility will then prompt you for a passphrase. Press enter to give no passphrase. The point
of creating the key is so that you do not need to enter a pass phrase (or password) all the time
-
cd to the location you were told was the default location. Usually this will work
cd .ssh
if not then maybe this
cd ~/.ssh
In the .ssh directory you should see two files: id_rsa and id_rsa.pub. These are your private and public keys, respectively.
-
Execute the following command
scp id_rsa.pub YOUR_NAME@goldengate.cs.brynmawr.edu:mypublickey
You will need to enter your UNIX password to complete this command. This copies your public key from your laptop to the Unix machines in the lab.
-
ssh into goldengate
ssh YOUR_NAME@goldengate.cs.brynmawr.edu
Again, you will need to enter your UNIX password
- On goldengate do the following
ls -a
to list all of the files in your home directory. In the listing look for a directory named ".ssh". If you do not have a directory so named, make one
mkdir .ssh
Now get into that directory
cd .ssh
if this directory contains the file authorized_keys then on goldengate
cat ~/mypublickey >> authorized_keys
This will append your public key to the file authorized_keys.
Else
cp ~/mypublickey authorized_keys
-
Finally, exit goldengate
exit
-
log back into goldengate as in step 5. If everything worked correctly you should not have to enter a
password. This is what you want! If you are still asked for a password, you did something wrong. Find me for help (or try again, or ask a classmate).
Set up an ssh config file
-
Within the .ssh directory on your local machine create a file named config. You can use VSC to create this
file (recommended). The easiest wat to do this is
- install the remote extension pack as described in HW1
- open the command palette (usually by hitting the F1 key)
- enter/select "remote-ssh: open ssh configuration file"
Alternately on Windows use notepad and on a mac use textedit. If you use notepad or textedit, they
will want to put a ".txt" extension on the file. You will need to get rid of the extension, as below.
Into config file put the following:
        Host *
            StrictHostKeyChecking no
            ConnectTimeout 5
        Host goldengate
            HostName goldengate.cs.brynmawr.edu
            User YOUR_UNIX_NAME
        Host labXXX
            HostName XXX.cs.brynmawr.edu
            User YOUR_UNIX_NAME

        Host labYYY
            HostName YYY.cs.brynmawr.edu
            User YOUR_UNIX_NAME

        Host labZZZ
            HostName ZZZ.cs.brynmawr.edu
            User YOUR_UNIX_NAME
In the above you will need to replace YOUR_UNIX_NAME with your unix login name. Also replace XXX, YYY and ZZZ computer nicknames. Get a nickname:
- Go to the lab status page. There is also a link to this on the class homepage.
- Pick at least 3 machines from the list; using the word in the nickname column ... it probably does not matter which machines you pick, but do not just pick the first 3.
- Replace each of XXX, YYY and ZZZ, respectively, with the nicknames of the machines you picked.
- In a terminal window
cd ~/.ssh
- Check the file name you just created
ls
if the file is named just "config" that is what you want. If it is named "config.txt"
On a Mac:
mv config.txt config
On windows (I think):
rename config.txt config
You can create more than 3 of these configurations. Sometimes a machine will be unavailable; either because it is off or running windows or it is simply being heavily used. So, it is good to set up options for yourself and then check the load on the machine you are planning to use.
-
test this configuration. In a terminal/powershell
ssh labXXX
(replace XXX as appropriate). This should get you a terminal on the machine whose IP address ends in XXX.
The configuration is important. The remote ssh extension package you installed into VSC requires it.
If the test above does not work, find me.
Do not go further with these instructions until you have a working keypair and config file.
(There is a lot more you can do with configuration files.
Feel free to explore.) The first config gets you to goldengate; one of the department's servers. For file
copying and general low-level stuff you can use that. The labXXX configurations connect you to a lab computer. Goldengate and the lab computers use a shared file system; all of your files will be visible from both machines. Importantly, the programming languages used in this course are NOT installed on Goldengate so you will need to use the "labXXX" configurations to work remotely. (Actually, Go may be installed on Goldengate, but it is an older version.)
Make a directory where all of your work will live on CS servers
open a terminal/powershell and connect to goldengate (or a lab machine) using ssh (you can use the terminal from previous steps if it is still
open).
Create a folder into which all of your 245 work will be put. Then create a folder inside of that into which one
assignment (or lab) or whatever will be put. For example:
            mkdir CS245
            cd CS245
            mkdir hw1
            cd hw1
            touch test.txt
Leave this terminal open and connected. YOU will reuse it is a couple of minutes
Within VSC use RemoteSSH to connect to the directory you just made
- Open the "command palette". (View menu / Command Palette" (the F1 key usually works also)
- Enter "remote-ssh: connect to host" You actually just need to enter enough of this to get that option to show, then tap on the item
- You should get a list of hosts to connect to. These should be the ones you set up in the config file. Tap on one of the labXXX.
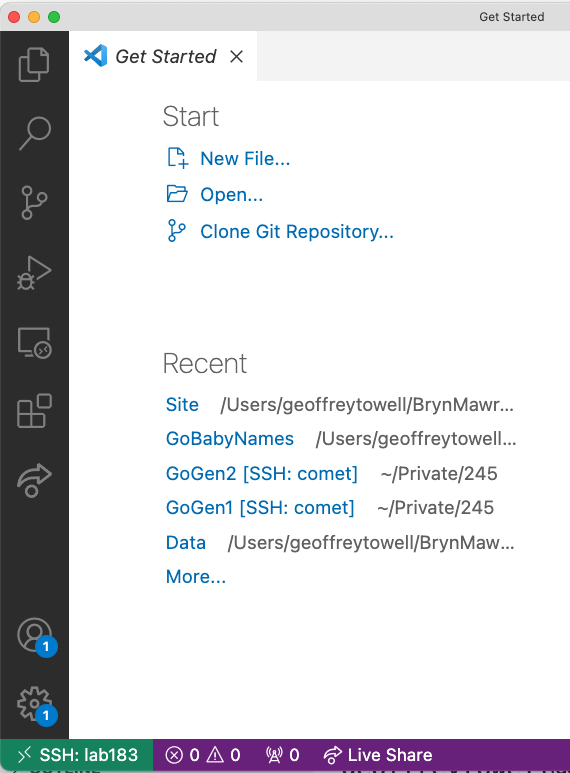
- This will likely open a new VSC window. If all is well in the bottom left of this window you will see a green box with "SSH: labXXX" in it. Your window should look something like this
- Tap on "Open ..." underneath "Start" near the top of this window. In the popup select the CS245 directory you just made.
- Open the file test.txt, enter something into it, then save
What to turn in
Having done all of the above, write a 1-2 page report. The report should have three parts.
- The first part is simply a copy of your public key. DO NOT include your private key. (Never give anyone your private key.)
-
The second part is a listing to every UNIX command used in this assignment and a brief description of what that command does. The descriptions can be very brief (for instance, for mkdir "make a directory" is sufficient. If a command used an optional argument (for instance ls -a) your description should include a description of the effect of that argument. For all UNIX commands, you can get a blizzard of information by entering the command
man COMMAND
Often (but not always) you can get similar information by entering
COMMAND --help
- part 3 -- less than one page. One of the major differences between Go and Rust is the use -- or non-use -- of a semi-colon to end lines. Which do you prefer and why? Be very specific in your discussion. I am looking for opinions, but backed by logic. You might read The semi-colon wars for some thoughts on this topic.
Citations:most (all) of the material you will need to write this report is available of the web. Use it. Cite it. If you directly quote, then indicate that you are directly quoting.
You may submit this report either as a plain text file or a PDF. Do NOT submit in any other format.
How to submit
Get your report onto a unix server. Once there, go to the cs245 directory you created earlier. Make a new directory -- for instance HW1. Put your report into the HW1 directory. Change your own directory to your cs245 directory. Execute the following command
/home/gtowell/bin/submit -c 245 -d HW1 -p 1
There may be other versions of this program on the servers. Be sure to use mine.
The arguments here have the following meanings:
- -c the course number
- -d the directory that contains the material to be submitted
- -p the assignment number
You may submit as many times as you like. Successful use of submit is a part of the grade for this assignment. So try this step early. If you cannot get this submission procedure to work; ask me or a classmate.