CS91 Computer Animation: Lab 7
In this assignment, you will implement crossfading between two motions.
Step 1: Get the source
Sadly, due to last week's snafu with github and the fact that not everyone has yet checked in their basecode from last week, I must distribute the assignment as a tar file again this week. The tar file is here. The file must be downloaded into the root of your repository and then extracted like so
> tar xvzf blendAssignment.tar.gzTo make things easier next week, let's check in the basecode (as well as our current assignment progress) first thing this lab!
Step 2: Compile and run
Same as before, you should compile all source in a build subdirectory. The compiled applications will be in /bin as with the rotation assignment. Additionally, the asisgnment includes 'solution' versions of the assignment libraries which you can use to build a 'solution' version of the demo.
> cd build
> make
> ../bin/BlendViewer
> ../bin/BlendViewer-Soln
User interface overview
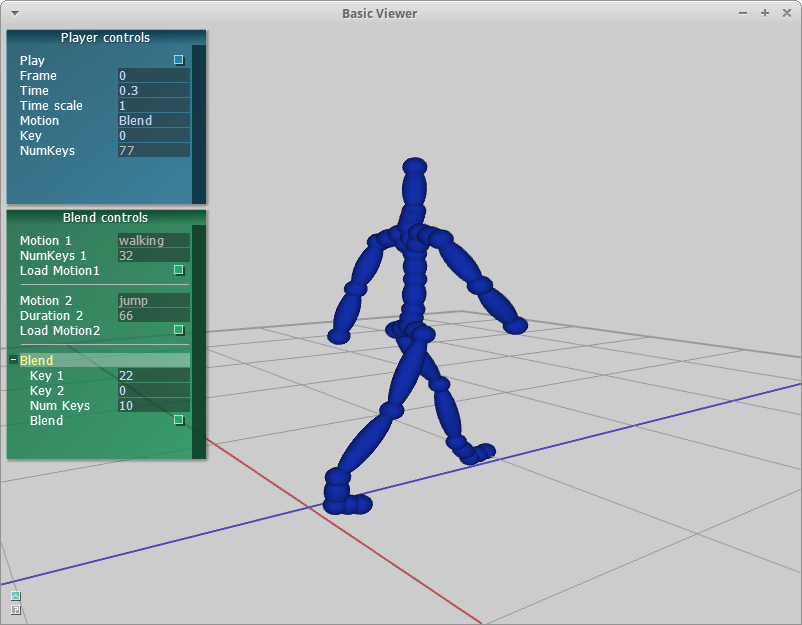
The basecode includes a simple interface and 3D viewer for loading and playing blended BVH files. See above for a screenshot. By default, we will load a character and several example BVH files.
The camera can be controled with the mouse:
- Left-button drag with the mouse to rotate
- Right-button drag with the mouse to pan
- Middle-button drag with the mouse to zoom
- 'f' button will focus the view on the character
Blend controls
The panel at the bottom left can be used to perform blends between motion 1 and motion 2.
The top section displays the name and number of keys in motion 1. Click the 'Load Motion 1' button to change this file. The next section has the same functionality for motion 2. During debugging, you may wish to hard-code a pair of motions to load on startup. You can do this by modifying BlendMain.cpp in /aMotionBlend.
The last section of the panel contains parameters for controlling the crossfade blend.
- Key 1 is the start key ID from motion 1.
- Key 2 is the end key ID from motion 2.
- Num Keys is the number of keys to generate for the blend
- Clicking the blend button computes the blend. The resulting motion is set for the character.
Assignment: Crossfading Due April 7
For this assignment, you will implement a crossfade between two motions. The cross fade should begin on motion1 ending on startKeyId and blend to motion2 starting at endKeyId. In other words, your blend regions should be [startKeyId, startKeyId+numBlendFrames] on motion1 and [endKeyId, endKeyId+numBlendFrames] on motion2.- (10 points) Implement MotionBlender::append. Append should add keys from the given input motion to the output motion. Keys can be added by appending poses or by working with motion curves directly.
- (25 points) Finish the implementation of MotionBlender::blend() in libsrc/animation/aMotionBlender.cpp. The blend function should combine motion 1 and motion 2 together with a smooth cross frade to transition between them and put the result into the member variable mBlend.
- (20 points) Implement MotionBlender::align. The
current motion curves contain global position changes for the root. By default,
the blend will snap to the starting position of the next motion unless the
target motion is transformed to align with the end position and rotation of the first
motion.
- (10 points) Align root positions.
- (10 points) Align root heading.
- (25 points) Implement MotionBlender::crossfade. Compute the transition frames from motion 1 to motion 2. The blend weight should change linearly across the blend duration such that the weight is 0.5 halfway through the fade.
Implementation advice: Create the functionality in this assignment in stages, so you can debug new functionality one step at a time. I recommend building up your assignment as follows
- To start, simply concatenate the two motions together. You should see the motion1 snap to motion2. Implement append() and call append from blend() to test it.
- Next, match the position of motion2 to motion1. Implement this functionality in align() and extend blend() to call it. Now, your second motion should start playing at the same location where motion1 completes.
- Next, extend align() to match the heading.
- Finally, implement crossfade between motion1 and motion2
Extra challenge
- Reduce foot sliding. Detect foot contacts and ensure the foot contacts do not move during blending
- Experiment with different types of blending. For example, try splicing an upper body motion onto a lower body motion. Or try blending a sequence of motions to create a unique walk.
- Create multiple characters.Instantiate multiple BVHController characters. Offsetting the root positions of the motions for each will place them in different parts of the environment. You might make a group walk in formation or you could create a dance party!
Creating a unique character
For those of you who would like to create a unique character, here is a modified aCharacterDrawer code to give a simple example of how this can be done.Submission Guidelines (5 points)
Submitting your assignmentStudents should submit their code along with a README and videos. The README can be very brief, consisting of
- answers to questions,
- descriptions of what was completed, including extra challenges, and
- how long the assignment took you and what was the hardest part
- Capture the demo window with recordmydesktop --windowid [OpenGLViewerId] demo.ogv
- To get the window id, run xwininfo and selected the homework window .
- Check the recording with mplayer demo.ogv or run firefox demo.ogv
NOTE: If you're running out of space because of big files, try using the /local drive for temporary storage.
About checkins
You will be asked to briefly checkin (less than 1 minute) about your homework assignment. This is not intended to much work. Please don't prepare slides or a voice over for your video. None of these are necessary! Some ideas of what you might like to talk about:
- Give your name (at least to start, until everyone gets to know each other)
- Say one interesting thing about your assignment; ideally something unique to your experience. Some ideas
- Did you learn anything (os, programming, tools, etc) while working on the assignment that might be interesting or helpful to the whole class?
- Were there any interesting/surprising bugs that you encountered?
- Describe any extra challenges you completed.
- Did the assignment make you curious about any related topics?