CS91 Computer Animation: Lab 8
In which, we implement features to directly set positions for joints.
In this assignment, you will implement inverse kinematics.
Step 1: Get the source
Happily, this week's source has been checked into your repositories! Yay!
> git pull
Step 2: Compile and run
Same as before, you should compile all source in a build subdirectory. The compiled applications will be in /bin as with the rotation assignment. Additionally, the asisgnment includes 'solution' versions of the assignment libraries which you can use to build a 'solution' version of the demo.
> cd build
> make
> ../bin/IKViewer
> ../bin/IKSimple
> ../bin/IKViewer-Soln
User interface overview
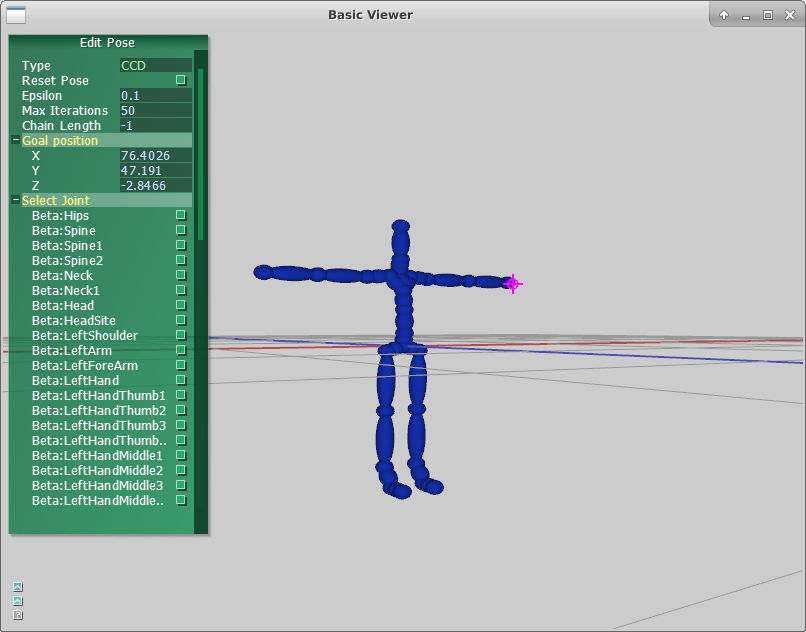
The basecode includes a simple interface and 3D viewer for testing your IK algorithms. See above for a screenshot.
The camera can be controled with the mouse:
- Left-button drag with the mouse to rotate
- Right-button drag with the mouse to pan
- Middle-button drag with the mouse to zoom
- 'f' button will focus the view on the character
IK controls
The left panel contains controls for your IK algorithm.
- Type: A dropdown menu for selecting either Analytic or CCD based IK.
- Reset Pose: A button that resets the pose
- Epsilon: A CCD parameter which determines how close the selected joint should be to the target position.
- Max iterations: A CCD parameter which determines the number of iterations of CCD to perform each frame.
- Chain length: A CCD parameter which determines how many descendent joints to use for IK.
- Goal position: controls for directly setting the goal position
- Select Joint: The list of joints loaded for the character. Clicking on a joint will select that joint for IK.
The target position can also be moved with the mouse by holding down the Ctrl key.
Assignment: IK Due April 22
In this assignment, you will implement inverse kinematics. Unlike the previous assignment, where we compute the pose outward from the root, we will now compute the limb orientations based on desired positions for a limb. You implement two algorithms for doing this: a direct analytic method and cyclic coordinate descent (CCD).- (20 points) Implement IKSimple::updateIK() located in aIKViewer/IKSimple.cpp. This application creates a 2 link skeleton to match the example discussed in class. In updateIK, solve for the rotations (Joint* root, elbow) which places the end effector (e.g. Joint* wrist) at the desired goal position.
- (20 points) Implement IKController::solveIKCCD() located in libsrc/animation/aIKcontroller.cpp. Given the joint specified by jointid, make its position match goalPos. The chainsize indicates how many descendents to use for the CCD algorithm. When the function returns, IKController::mSkeleton's pose will have the end effector matching the goalPos (as close as feasible).
- (20 points) Implement IKController::solveIKAnalytic() located in libsrc/animation/aIKcontroller.cpp. Given the joint specified by jointid, make its position match goalPos. Base your answer on the analytic method you implemented in the previous question adapted to a generic character skeleton. When the function returns, IKController::mSkeleton's pose will have the end effector matching the goalPos (as close as feasible).
Implementation Hints
- Use can use mat3::FromAxisAngle() to compute a rotations matrix given an axis (normalized) and angle (in radians)
- DON'T FORGET: When you change the local rotation of a joint, you must call updateTransforms() to update the global rotations and translations.
- When implementing IKSimple::updateIK(), it is best to approach the task systematically. I strongly recommend the following approach
- First, solve for \(\theta_{2z}\) and set the rotation for the elbow. If done correctly, the distance between the wrist and root will match the distance between the goal position and the root. Write code to verify whether the distance is correct. To help you test, set the goalPosition a fixed distance from the origin. For example, 170 units away along the X-axis.
- Next, solve for \(\theta_{1z}\) and set the rotation for the root. If done correctly, the wrist should be at the desired position so long as you only move the goal along the X-axis. Because of coordinate system differences, you may need to negate the angle \(\theta_{1z}\) from the one derived in class.
- Last, solve for full root rotation in terms of \(\gamma\) and \(\beta\). Once correct, the wrist position should match the goal position -- so long as it is in reach.
- To debug IK on your character, enable drawing axes in aCharacterDrawer::drawJoint() (libsrc/animation/aCharacterDrawer.cpp)
- When implementing CCD, make the chain length 1 to start and ensure that a single joint can follow the target. Make sure that your angle/axis computation is correct by testing that rotating by the computed matrix indeed rotates the limb towards the target. Then, after this works, make sure that you can set the rotation matrix correctly in the joint's local coordinate system.
- When implementing solveIKAnalytic(), make sure that the original implementation in IKSimple works first. Then, implement the two steps of the algorithm (setting the length; setting the correct direction) independently. In other words, make sure one is correct. Then comment it out and implement the other, making sure it is correct. Then, debug getting the two steps to work correctly together.
- When implementing solveIKAnalytic(), limit the DOF of the middle joint to 1 rotation. In other words, semi-hardcode the ways the middle joint is allowed to
rotate. For this character, you can use
vec3 limbDir = middleJoint->getLocalTranslation();
limbDir.Normalize();
vec3 axis = limbDir.Cross(vec3(0,0,-1));
if (limbDir[1] < 0) axis = limbDir.Cross(vec3(0,0,1));
The axis computed above replaces the z rotation axis (0,0,1) which you used in IKSimple to rotate the elbow.
Extra challenge
- Create a procedural motion. Pin the feet and move the root to animate shifting weight for an idling motion. Create a walking motion by using IK on the feet.
- Modify a pose from an existing motion using IK.Modify an existing walk or create a waving motion based on idle.bvh
Submission Guidelines (5 points)
Submitting your assignmentStudents should submit their code along with a README and videos. The README can be very brief, consisting of
- answers to questions,
- descriptions of what was completed, including extra challenges, and
- how long the assignment took you and what was the hardest part
- Capture the demo window with recordmydesktop --windowid [OpenGLViewerId] demo.ogv
- To get the window id, run xwininfo and selected the homework window .
- Check the recording with mplayer demo.ogv or run firefox demo.ogv
NOTE: If you're running out of space because of big files, try using the /local drive for temporary storage.
About checkins
You will be asked to briefly checkin (less than 1 minute) about your homework assignment. This is not intended to much work. Please don't prepare slides or a voice over for your video. None of these are necessary! Some ideas of what you might like to talk about:
- Give your name (at least to start, until everyone gets to know each other)
- Say one interesting thing about your assignment; ideally something unique to your experience. Some ideas
- Did you learn anything (os, programming, tools, etc) while working on the assignment that might be interesting or helpful to the whole class?
- Were there any interesting/surprising bugs that you encountered?
- Describe any extra challenges you completed.
- Did the assignment make you curious about any related topics?